These are very time consuming but utterly gorgeous. They're also apt to set off metal detectors, so if you're making them for gifts and flying, please put them in the checked luggage.
You will need:
Holiday cloth, preferably quilting cotton or iron-safe velvet
Styrofoam balls, about three inches across
A rotary blade, a cutting mat, and a cutting ruler (or you'll be at this forever)
Innumerable sequin pins (or at least ninety per ball)
Wide and narrow ribbon
A corsage pin or other long, attractive pin (but not longer than the ball is wide!) plus two long pins with attractive ends
Sequins, if desired
Crazy glue
You begin by cutting strips of cloth 2 1/2 inches wide and ironing them in half with the good side out. Then you cut the strip into 2 1/2 inch sections (so that if you unfolded them, they would be square.) Then you fold the already folded edge down on either side of the center so that they are triangles and iron again. You will need at least forty such triangles for one ball, preferably in pairs or fours or eights so that each side matches.
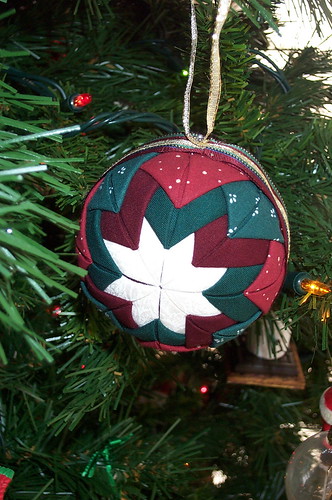
To begin, you take a square or scrap that hasn't been ironed and pin it down on one side of the ball. Then you take some of your ironed triangles and unfold them enough to stick a pin through the point. Pin four of those onto the cloth square so that the folded edges are up, as in the center of the picture above. Pin down their corners so that they lay more or less flat against the ball.
Take eight more triangles, possibly of alternating colors, and put pins in their points as well. Pin them halfway up the place where the folds meet on the center triangles and at the same distance from the center in between the triangles. Always overlap them the same direction— make sure that the right side of the triangle goes over the left side, or vice versa. Pin down their points. I find that it saves time and pins to overlap them first, then pin down through the top layer near the points.
Once again, take eight triangles and put pins in their points, and pin them halway down the place where the folds meet on the previous layer. Overlap as before and pin the edges down. The only pins that should be visible at this point are the ones on the outer edge.
Do the other side the same way, making sure that it is directly opposite the first side. I have had to pull out and start over when it became evident that I was way off the mark to begin with, so save yourself time and get it right at the start.
When both sides are done to your satisfaction, pin a length of the wide ribbon around the edges, folding the cut edge under before pinning. This makes it look finished. Then take a contrasting narrow ribbon and wrap it around the ornament as well, pinning it so that a three-inch loop hangs from the "top" of your ornament. Secure it in place with a final corsage pin, and when that is placed to your satisfaction, pull it out a bit, put a bit of glue on the pin, and push it back into place. That will hold it securely.
You may also put a pin with an iridescent or sequinned top in the center of each "star." When I made the ornament pictured above, I didn't have any pretty pins, so I did without.
No comments:
Post a Comment