Monday, December 12, 2005

Traditional Polish-American Christmas Eve Meal

When I was growing up, we always had the "traditional" Polish Christmas Eve meal. As this meal involved can openers, you can see that it's not that traditional. However, thanks to the Power of the Internet, it's pretty easy to go back to the roots and find out where the traditions actually came from and what, precisely, they are supposed to be.

To begin with, the Christmas Eve meal is vegetarian. However, this came from a time when "vegetarian" meant "not animal", so part of the meal is fish. I waffled between liking this and not liking this part. Other parts of the meal usually flipped around in favor as well, depending on my tastes at the time.

The meal begins at the time the first star is sighted. This may be difficult if the sky is overcast or you live in a city. Substitution of a blinking plane is acceptible. The meal itself is the Wigila, the Vigil. One should put a white tablecloth on the table and leave an extra place setting for absent family members. Please note that small children in the family will probably object to this custom, as it interferes with their sense of what is right. Ignore them.

The meal opens with soup, a potato-mushroom one. Growing up, this was Campbell's— one can each of cream of potato and cream of mushroom. But since I've grown up and learned to cook, it's much more fun to make from scratch. This dish can be made early and heated up at the last minute.
Thick and Chunky Potato-Leek-Mushroom Soup

You will need:
-Leeks. My original recipe calls for three medium leeks but they grow them really big around here, so I use one large. This is oniony, so increase or decrease it based on your preferences.
-Potatoes. Again, this calls for four "medium" potatoes and I have yet to run across a truly medium potato.
-Butter. Ain't nothing like the real thing, and you'll need a lot for another dish.
-Mushrooms. The standard store mushroom is fine, but Crimini (Italian Brown) mushrooms are similar in taste to Portabella mushrooms, but cheaper.
-Chicken broth. Buy the low-sodium kind or make your own. Yes, you can use vegetable broth as well.
-Milk.
-Salt and white pepper, unless you don't care about little black flecks in your food, in which case black pepper works fine.

Cut off the green stems of the leeks and wash to remove sand. Cut them longwise and then crosswise into little chunks. Melt the butter over low heat in your soup pot and saute the leeks until soft, about five minutes.

Peel and cut the potatoes into inch-wide chunks. Throw them into the pot. Cut up the mushrooms. Throw them into the pot. Use enough broth to cover the potatoes and mushrooms and set the heat to simmer. Partially cover the pot and simmer until the poatoes are cooked, about 45 minutes. At this point you can set it aside to wait for later.

It's later, so get out your blender. I generally pull out half of the chunks or potato and put them in the serving bowls, then take the remainder and put it in the blender with milk and spices to taste. (Remember, liquids first! Don't burn out your blender; fried electronics have an unappetizing smell.) Blend until smooth— you may have to do this in sections— and reheat if necessary, then pour over the chunks of potato. Serve immediately.
The next course of the meal is the main course. This includes a fried white fish, boiled cabbage or sauerkraut (oddly enough, I never quite liked this part), and pierogi (little Polish dumplings) filled with things such as prunes and cottage cheese with cinnamon.

No, really. It's actually supposed to be a soft cheese with cinnamon. Cottage cheese not only fits the bill, it's quite common in this regard.

Last year, for the pierogi, my sister served Trader Joe's Potato Cheese Pierogi. My father— the one who was raised with this traditional meal— tasted them, and said they tasted nothing like what he grew up with. After a pause, he added, "This is much better." This company sells pierogi, if you don't have a Trader Joe's in your area— that would be anyone who doesn't live in the Western states.

If you want to cook your own, Cooks.com has a bunch of recipes. Just remember that fillings such as prunes, raisins, and cottage cheese are among the traditional ones. No wonder my interest waffled.

As for the fish, pick one that is native to your area for the best effect, though I'd avoid catfish. It is to be fried in butter with slices of hard-boiled egg. You may see some recipes refer to "brown butter"— this is a high-fat European variety that is often available in the supermarket under varying names. This Thanksgiving I was treated to pumpkin ravioli fried in brown butter and sage, and I can attest that it is Oh. So. Good. Be careful not to burn the butter, though.

And then we come to the cabbage. I never liked this part, but I've found some recipes that may improve on the simple "boil and add salt and pepper" method.
Cabbage With Caraway

You will need:
-Water
-Onion, fresh or dried
-Caraway seeds
-Salt
-Small head of cabbage
-A big pot

Boil about a quart of water with a little minced onion, salt, and caraway seeds. After about ten minutes, cut the cabbage into small wedges and boil until tender, but not so long that the whole thing is mush. Serve immediately.
Caraway is apparently one of the traditional Polish spices.
Boiled Red Cabbage

You will need:
-1 small red cabbage, quartered and thinly sliced
-1 tart apple, grated
-butter (again!)
-1/4 cup vinegar (I suggest apple cider vinegar, for consistency)
-1/2 cup red currant jelly
-1/4 cup water
-salt

I don't know the specific name for this kind of pan, but one of those saucepans that looks like a cross between a handled pot and a frying pan, with a lid, is a pretty good bet for this recipe. Melt the butter over gentle heat, then add everything else, cover, and simmer for about one hour, stirring occasionally. The vinegar will help the cabbage retain its color.
Now we move on to the fruitbread. This is some sweet bread with dried fruits in it.

And let the fruitcake jokes begin. I never understood these jokes as a child— I loved fruitcake. When I got older, I discovered that not all fruitcakes are created equal. Those nasty, brutish things you get from some supermarkets, or that horrible concoction with the unverifiable fruitlike things that your Aunt Martha made are the source of all the jokes. Instead, we got our fruitcakes sent to us from some company in Texas that made a moist, molasses-wonderful confection.

I'd link, but I have no idea who they are. Instead, I'll link the Harry & David site, as their fruitcake is similarly tasty. (You know Harry & David. They're the Fruit of the Month Club™ guys.) Or if you make your own, carefully marinating it over several months with high-quality rum, please don't burn it as my friend Stephanie's aunt invariably did. As she said, "We assumed it was good, but it never got as far as the table."

Okay. The final part to the meal is the sharing of the oplatek, a thin unleavened wafer (available through the internet.) The oldest person breaks it with the next oldest, then that person with the next, and so on down the line until everybody has broken oplatek with everyone else and there are little unleavened flakes all over the floor. Then you eat it and it gums up your teeth.

Ah, memories. Shortly afterwards we were sent to bed so we could get up in time for Midnight Mass, and my parents would assemble any presents that needed assembly. One year, I could make absolutely no sense out of the sounds coming from the front room— a sort of whirring, grinding sound.

That was the year I got an electric train, HO scale. Very cool, and it's still somewhere at my parents' place...
Sunday, December 11, 2005

Cloth Ball Ornaments

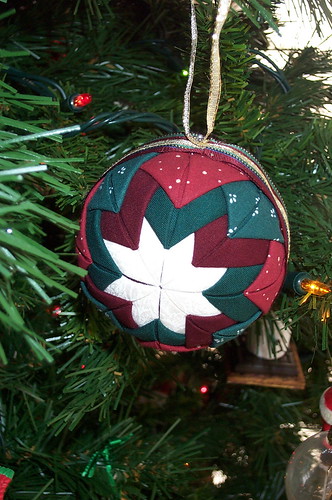
Cloth Ball Ornaments

Cloth Ball

These are very time consuming but utterly gorgeous. They're also apt to set off metal detectors, so if you're making them for gifts and flying, please put them in the checked luggage.

You will need:
Holiday cloth, preferably quilting cotton or iron-safe velvet
Styrofoam balls, about three inches across
A rotary blade, a cutting mat, and a cutting ruler (or you'll be at this forever)
Innumerable sequin pins (or at least ninety per ball)
Wide and narrow ribbon
A corsage pin or other long, attractive pin (but not longer than the ball is wide!) plus two long pins with attractive ends
Sequins, if desired
Crazy glue

You begin by cutting strips of cloth 2 1/2 inches wide and ironing them in half with the good side out. Then you cut the strip into 2 1/2 inch sections (so that if you unfolded them, they would be square.) Then you fold the already folded edge down on either side of the center so that they are triangles and iron again. You will need at least forty such triangles for one ball, preferably in pairs or fours or eights so that each side matches.

To begin, you take a square or scrap that hasn't been ironed and pin it down on one side of the ball. Then you take some of your ironed triangles and unfold them enough to stick a pin through the point. Pin four of those onto the cloth square so that the folded edges are up, as in the center of the picture above. Pin down their corners so that they lay more or less flat against the ball.

Take eight more triangles, possibly of alternating colors, and put pins in their points as well. Pin them halfway up the place where the folds meet on the center triangles and at the same distance from the center in between the triangles. Always overlap them the same direction— make sure that the right side of the triangle goes over the left side, or vice versa. Pin down their points. I find that it saves time and pins to overlap them first, then pin down through the top layer near the points.

Once again, take eight triangles and put pins in their points, and pin them halway down the place where the folds meet on the previous layer. Overlap as before and pin the edges down. The only pins that should be visible at this point are the ones on the outer edge.

Do the other side the same way, making sure that it is directly opposite the first side. I have had to pull out and start over when it became evident that I was way off the mark to begin with, so save yourself time and get it right at the start.

When both sides are done to your satisfaction, pin a length of the wide ribbon around the edges, folding the cut edge under before pinning. This makes it look finished. Then take a contrasting narrow ribbon and wrap it around the ornament as well, pinning it so that a three-inch loop hangs from the "top" of your ornament. Secure it in place with a final corsage pin, and when that is placed to your satisfaction, pull it out a bit, put a bit of glue on the pin, and push it back into place. That will hold it securely.

You may also put a pin with an iridescent or sequinned top in the center of each "star." When I made the ornament pictured above, I didn't have any pretty pins, so I did without.

Saturday, December 10, 2005

Blown Egg Ornaments

Blown Eggs
Blown egg ornaments are inexpensive to make, and a lot of fun for the craft-minded. However, they do take some time so plan ahead.

You will need:
Eggs - keep the carton
Tiny drill bits
Something long, thin, and sharp - my father uses a medical instrument used to prick the skin for a blood droplet test. It looks like a claw.
A large bowl
Good lungs or a bulb for blowing eggs; you can also use a syringe

Let the eggs sit out at room temperature for an hour. This means, of course, that you'll have to use them within a day or two. Try to blow eggs just before a cookie-making session or have quiche for dinner. Decide which end you want to be the top; that end will get the larger hole. Take a tiny drill bit and a slightly larger one; use your fingers to make the holes in either end. (It is a bad idea to use a pin or a needle to make the holes because this will lead to cracked eggs.) Use the sharp thing to poke around in the egg; you want to not only break the yolk but make sure all interior membranes are broken.

Blow slowly and carefully into the smaller of the two holes; the egg should come out of the larger. If you blow too strongly you can crack the egg. Artificial aids are good to use if you have them. Set the blown eggs aside on a paper towel. When they are all done put the egg stuff in the refrigerator before proceeding. Get a bowl of soapy water; immerse the eggs. (You can also use a syringe to fill the eggs with soapy water.) Put your fingers over the holes and shake each egg so that the interior is throughly washed; drain and set aside.

This is the time consuming part. Put the eggs someplace until they are completely dry; this can take several days.

Now you will need:
Nylon string to hang the eggs; ribbon deteriorates over time
Hot glue or Krazy glue
Spray lacquer or clear nail polish
Spray paint and craft paint
Any decorations you wish to attach such as sequins, plastic gems, or ribbon

Once the eggs are dry, cut five-inch lengths of the string. Tie a knot in them to make a loop. Feed the knot end into the bigger hole of the egg and glue to secure. Make sure the hole is completely plugged; take a little glue and seal the other hole as well. Once the glue is dry, hang the eggs with cardboard or newspaper behind them; give them a light coating of spray lacquer. Turn them around and repeat. Let it dry and then give them a second coat. (This strengthens them.)

Use the spray paint to give them a base coat; careful spattering can acheive an artistic effect. Paint names, symbols, or pictures on them with the craft paint; glue confetti, glitter, or ribbons on as desired. Decoupage is also a good technique if you know it. Tie a bow around the base of the loop with a pretty ribbon.

Store the egg ornaments in the carton. Over the years you can build up quite a collection; my parents have several dozen, some going back for three or more decades.

Friday, December 09, 2005

Walnut Mice

Walnut Mice

The hardest part of this ornament is cracking the walnuts correctly.

You will need:
Whole walnuts (and a nutcracker)
Felt
Ribbon
Googly eyes
Pipe cleaners
Hot glue or Krazy Glue
Permanent marker

Carefully crack the walnuts along the line; the goal is to get a perfect walnut shell half. Empty out the walnut meat and eat as desired. The pointier end of the walnut shell is the nose of the mouse. Use the marker to put a nose on the little beastie. Draw some whiskers or make them out of pipe cleaners, if you desire. Cut out little half-circle felt ears; glue them on. Give the mouse some googly eyes. Glue a tiny bow on the mouse's "neck." Glue a pipe cleaner tail to the underside of the other end. Take a six-inch piece of pipe cleaner and glue it to the underside of one side; you use this to attach the mouse to a branch.

(Alternately, dry out a mini bagel that has had part of its top "eaten" by putting it in the oven on low heat for several hours; spray lacquer it and glue the walnut mouse right next to the eaten section. Attach a loop to the bagel and glue a ribbon to it.)

Thursday, December 08, 2005

Paper Crane Ornaments

Paper Cranes
Paper cranes are a traditional Japanese symbol of peace. There is a legend that the person who folds a thousand cranes will get his wish. They're also very attractive on the Christmas tree.

You will need:
Heavy grade origami paper (try an Asian market for the best styles)
Strong thread
A long, sharp needle
Beads
Little metal rings, 1/4 inch to 1/2 inch
Ribbon, if you like

Fold paper cranes out of the paper. Here's a good How To. Thread the needle with lots of thread (but not so much that you get tangled in it.) Push the needle through the hole in the bottom until it comes out through the top of the crane. Pick a spot 1/4 inch from where the needle came out and push it through there and back out through the original hole. (Lightweight paper tears too easily for this to work.)

Choose which beads you want and put them on the thread. Thread one of the metal rings and then go back down through the beads to the crane. Stitch through the paper again, go back up through the beads, through the metal ring, and back down through the beads. Make sure the string of beads is tight. (But not excessively tight because it will tear the paper.) Push the needle through the top of the crane back down through the hole in the bottom.

Choose some more beads; string them and pick a bead to be the base. (There are many pendant beads for this purpose, but one that coordinates with the thread will also work. Go through that base bead just like you went through the metal ring on the top; go back up through the beads. Stitch through the paper and repeat going through the beads. When you are done, whip stitch around the base of the crane a few times, then slip the needle under the loops, knot the thread, and cut it off. Tie a ribbon bow to disguise the knot; hang from the metal loop.

Wednesday, December 07, 2005

Seashell Ornaments

Seashells
You will need:
Hot glue gun
Shells
Nylon string
Ribbon

This ornament idea came about primarily as a way to deal with an excessively large seashell collection, most of which never saw the light of day. You may have such a set as well, particularly if you have been given one of those little baskets of seashells that seem to be a common bathroom decoration.

Cut five-inch lengths of string, double them, and knot them. Glue them into the open end of the shell so that it hangs point down; in the case of scallops, glue unobtrusively to the hinge area. Tie a ribbon bow around the string where it meets the shell.

If you have a number of spiral shells of the same type and size, you can make stars. Arrange them on a table, open ends facing in, until you know how many will fit together. Carefully apply hot glue around the open edge of one shell and hold it next to its neighbor until the glue cools. Continue with the rest of the shells until the star is complete, gluing the loop into one of the joins. Tie ribbon around the loop.

Sand dollars are also fun, though fragile. (They are best found on the beaches around San Francisco in October if you can stand the cold; leave them in a bucket of diluted bleach for a week or so, then dry. Don't worry about getting all of the sand out. You can't.) Glue a loop into the hole on the backside, then anchor it with a spot of glue on the edge of the shell so it hangs straight. You can also use craft paint to follow the star patterns on the front; I suggest diluting it so that it looks like watercolor.

Tuesday, December 06, 2005

Sequin Present Ornaments

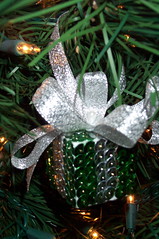
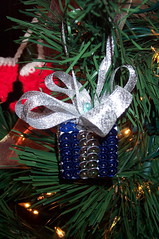
Blue Present

Sequin Presents
You will need:
Small cubes of foam, 1.5 inches
Colored sequins and silver or gold sequins
Metallic ribbon, 1/2 inch
An ungodly number of sequin pins (really short)
Longer decorative pins with pearlized balls on the ends (make sure they are not longer than the cube)
Krazy Glue or its equivalent
Thimble

This is pretty simple. You take one color of sequin, red or green or blue or whatever, and a contrasting metallic sequin color. You take one sequin pin per sequin and apply the pins to the cube. The metallic sequins are the "ribbon" around the present, so a typical side of sequins will look like this:

R R G G R R
R R G G R R
R R G G R R
R R G G R R
R R G G R R
R R G G R R

The top and bottom have crosses, as though the ribbons cross.

R R G G R R
R R G G R R
G G G G G G
G G G G G G
R R G G R R
R R G G R R

When the entire cube is be-sequinned, take a length of ribbon of at least sixteen inches, and the long decorative pin. Fold one end of the ribbon over and stick the pin through it; the cut end should be toward the point. Make loops of about two inches by sticking the ribbon on the pin; use the last five inches to make a loop for hanging. Push the pin with its bow through the top of the present. Once the look is to your satisfaction, pull the pin partway out, put some crazy glue on the part right next to the cube, and push it back in. It should bond in a minute or two; after that, you can hang it immediately.

Present On the Tree

Monday, December 05, 2005

Christmas Traditions

I grew up in a large family, with multiple siblings and a Nana in the house. The necessities of that large family dictated several traditions, and then there were the ones we came up with on our own. I've already mentioned St. Nicholas Day, but there are other traditions worth observing:

—We never traveled. When your relatives all live in distant states, it isn't worth the hassle OR the recriminations ("You went to their place LAST year!")
—We went to Midnight Mass, which, of course, we young ones slept through.
—We were not allowed to open presents until Nana came out, and we were not allowed to bother her. Present opening therefore took place after eight or nine. (If you still have very small children, like toddlers, consider creating a reason why they can't open presents at 4AM. Make it an absolute prohibition, such as 'We can't open presents before breakfast and breakfast WON'T happen until the paper's been read' or some similar reason. Lie if you have to.)
—We received presents from our siblings, our parents, our Nana, and the Grinch. The Grinch's presents were usually silly.
—Stockings were not opened until after dinner. My parents reasoned that Christmas was a bit of a letdown after all of the presents were opened; the late opening of the stockings was a way to ease that feeling. Stockings had chocolate, small tchotchkes, and the like; nothing special, but fun.

Later on, other traditions accrued:

—Trolling for lights. The phrase is of my own coinage, and has been adopted by the family. It's not like I ever did more than simple bait fishing.
—Christmas wasn't always on Christmas. My sisters, who had waitressing jobs right after graduation, usually had to work on Christmas. My mother finally got sick of their being unable to come for Christmas and declared that she was making Christmas a day late, since neither had to work that day. Several years thereafter had arbitrary Christmas days.
—The water fight. It started when someone gave my father a SuperSoaker, and everyone else had little squirt guns in their stockings. Usually this was the guys' tradition, mainly because it was only the people who wanted to participate. Then one year my dad received a crossbow...
—Christmas bowling. This one was entirely accidental. My mom was looking for something to do one Christmas when one of my sisters had to leave early (and we had to open the stockings early as well.) She decided we could take advantage of the open bowling alley. We used silly pseudonyms, cried out "GOOOOOOOOAAAAAAALLLLLL!!!!" like World Cup announcers, and had a very silly time. The next year, we asked when the bowling was, having decided it was a tradition, much to my mother's surprise.

Sunday, December 04, 2005

Decorating Your Tree

This seems really self-evident, but only to those who have always done the decorating.

The first thing you need to do before you start decorating is ensure that the tree is stable. The last thing you want is to have a fully-loaded tree fall over, particularly on top of you. If at all possible, the tree should be away from the wall so that a person can get all the way around.

When decorating, it is a good idea to start with the lights. Before you even think about unwinding the strands, plug them in! It's better to find out which ones work before you wind them around a tree. Put non-working strands aside; there are methods for fixing them but just deal with the working strands to begin with. Run an extension cord to the tree. You might even choose to run the cord up the trunk and have the plug at the top. There's two types of serial plugs for Christmas lights; one is end-to-end and the other is plug-to-plug. Know which ones you have and plan before you string.

There's two methods of stringing lights. The first is the circle around the tree method; one starts at the top (or bottom) and winds the strands around the tree. End-to-end strands are ideal for this. The second is the branching method, a method best suited to plug-to-plug strands. Each branch is wound in lights starting from the trunk; on an artificial tree, careful planning can mean that the lights are stored on the branch itself.

The type of tree you have will determine the style of decorations you can put on the tree. Some trees have weak branches; they are best suited to lightweight ornaments. Some trees are open and can have ornaments all the way to the trunk. This type of tree is particularly handy when you have a surplus of ornaments. If you only have a few, however, you might want to go with a dense tree that you can't reach into.

Before decorating, you should consider the hazards your tree will go through. Rambunctious dogs? Perhaps the antique glass ornaments should stay in a box. Curious cats? Leave off the tinsel - it's irresistable and interferes with their digestion. Small children with sweet teeth? Restrict the candy canes to the upper branches alone.

The heaviest ornaments go closest to the trunk and the bottom as a practical consideration. On artificial trees, hang them in open spots to mask the metal trunk. One trick that is useful to know is that ornament hooks are bendable; crimp them onto the branch and the likelihood of them falling (or being knocked off) drops considerably. Light ornaments can go towards the top and the ends of the branches. Don't forget to decorate the back and sides; it is usually fairly obvious when the decorations are reserved to the front.

When all the decorations are in place, carefully move the tree back into position by kneeling and pushing from the base. (If the tree is light enough, lift it just a bit while someone steadies the top.) Plug in the extension cord and bask in the glow.

Next Up: Make Your Own Ornaments!

Saturday, December 03, 2005

On Picking a Tree Part III

Part 3: Cut Trees

The traditional Christmas tree has a history going back to Germany. Trees were originally hung upside down from the ceiling - a tradition that is sporadically springing up today. The tree became popular in the Anglosphere when Queen Victoria was shown with her family around one. Nowadays, Christmas trees are grown especially for the purpose, with over 75% of American trees grown in Oregon. (Some Oregon forests are creepy, like somebody used a clone stamp on the hillside. Rows upon rows of perfectly matching trees.)

Is a cut tree right for you? Consider:

Pro:
-Tradition.
-That real pine smell.
-The ability to pick exactly the shape, species, and size you want that year. I have yet to see a good-looking artificial Noble Fir.
-At the end of the holidays, it goes to the curb, and you don't have to worry about storage.

Cons:
-Allergies. (I know I keep harping on this point, but I have a sister-in-law who is deeply allergic to pine.)
-Fire hazard.
-Needles.
-The need to keep watering the tree.

When you purchase a cut tree, or cut your own, the first thing you need to do upon arriving home is to stick it in a bucket of water in a cool place, such as the garage. Your stand should be large and sturdy and preferably weighted; set it up near where you will be putting the tree but away from the wall. (If you put a piece of tarp or glide coasters underneath it, it will be easier to move near to the wall when you need to.) Using a sharp hacksaw, first cut any low branches that will be in your way - you should have six to eight inches of trunk clear at the bottom at least, and as much as a foot. Then cut a new cut across the trunk, because the initial cut will have dried out. Immediately immerse this cut in water and do not let it dry out; this will prolong the life of your tree.

For the stand water, you can purchase a plant life extender such as those that come with bouquets; however, all you really need is water, and lots of it. A cut tree drinks up to a gallon of water every day. Consider watering twice a day - more if you have pets who are drinking from the stand. A well-watered tree is less of a fire risk as well. (They used to put candles on the tree. Real, honest-to-goodness candles.) And it drops fewer needles.

Next: Decorating Your Tree

Friday, December 02, 2005

On Picking a Tree Part II

Part 2: Living Christmas Trees

A living tree, or a potted tree, is another option for those seeking a tree. They range in size from desktop to person-height, and have many of the advantages of both the fresh-cut tree and the artificial tree. Consider:

Pro:
-You don't kill a tree.
-That fresh pine scent.
-Works for years.
-You get greenery year-round.

Con:
-You have to take care of it year-round.
-After a few years, it loses its shape, sometimes drastically.
-After a few years it may also need to be repotted or planted.
-Allergies.

The most common live tree that I've seen is the Italian Stone Pine. From experience, my family calls it the Italian Stoned Pine. When small, its branches have single needles, like a fir tree; as they get larger, they have longer twinned needles, like the pine that it is. One such tree that we had lost its shape so dramatically that it looked like it fell over drunk; we tried to plant it but I'm afraid it died.

Italian Stone Pines get enormous if not checked; if you want to plant it outdoors you had better have an acre or two of property to shade. I'm not kidding.

You may also see some "trees" that are shaped herbs in pots, such as rosemary. These will only be good for the one season unless you are a bonsai master, but otherwise you've got a nice rosemary bush.

Some stores and catalogs sell pre-decorated live trees. That is an ideal gift for someone who loves Christmas but is unable to decorate; sometimes you can see them in nursing homes. They tend to sell out, so if that sort of gift appeals to you, don't delay.

Next: Cut Trees

Thursday, December 01, 2005

On Picking a Tree Part I

Part 1: Artificial Trees

The artificial tree has come a long way from its weird metal beginnings. Of course, you can still get an aluminum or pink Christmas tree if you know where to look, but in general, they can well mimic the real thing.

Is an artificial tree right for you? Consider the following:

Pro:
-It's hypoallergenic, doesn't shed, and is fire-resistant.
-It doesn't need to be watered.
-It's designed to be both stable and lightweight.
-You can set it up at the beginning of the month and know it will still look good at Christmas.
-Pricewise, you recoup your investment within five years (less for smaller versions.)

Con:
-You have to store the thing.
-Unless you buy a pricey one, there's still a good chance it will look fake.
-Again with the price: you may not be able to afford it.
-If you love the smell of Christmas trees, fake pine just doesn't cut it.*
-Like many other things, artificial trees are subject to the vagaries of fashion; right now there is no such thing as "medium" size (big and small exclusively), trees tend to be slim rather than full, and pre-lit trees are almost the only choice.

Pre-lit trees have their own pro and con. If you hate stringing lights, that's a pro, but if you would rather have flexibililty, that's a con. Pre-lit trees are best for those who have little time or inclination to decorate, such as seniors. My personal take is that I am leery of something that could break and be difficult to fix.

Artificial trees in general tend to be good with small children who are at the age of sticking things in their mouths, because while they still will gnaw on the tree, they won't be able to swallow it, anyway. They're also ideal for people who have lots and lots of ornaments because the strength of the branches is a given, as opposed to that of a real tree, and ornaments can be stuck deep within the branches without worrying about getting pricked by the needles (or throwing the ornaments out at the end of the season.)

When setting up an artifical tree, be sure to read the directions. For instance, many trees with flexible wire branches ask you to curve the branches upwards. This makes the tree look much more realistic and fuller. If you don't read the directions, you might end up wondering why it doesn't look like the picture on the box. Be sure to rotate the tree while setting it up to make sure it looks symmetrical. And if it's not pre-lit, consider tying an extension cord to the center pole before you put any greenery on; it will give you a handy place to plug in the lights.

As you can probably guess, I grew up with artificial trees, so I never missed the real ones. And as for the pine smell of Christmas, that smell makes me think of camping instead.

Next up: Potted Trees

*My personal theory as to why they never get the smell of pine right is that they deal with the needles exclusively, rather than understanding that "pine" is a gestalt of the needles, the bark, the sap and even a faint hint of dry dirt.